So, i’m setting up a CasparCG-server that is connected to 2 daisy chained Ultrastudio 4k. Both of them are set up as decklink consumers with diffrent channels. The purpose of the setup is to use one of them as video playout and the other as Key/Fill for lower thirds.
For now, everything works fine and i can surely play out different content to different Ultrastudios.
My question is if there is any way of assigning (maybe in the config file?) “Channel 1” to always pair with Ultrastudio #1 and “Channel 2” to always pair with Ultrastudio #2?
On reboot, it’s swapped around from how i set it up the first time
I use a similar hardware configuration to the one you describe here, with two 1U high Ultrastudio 4k units. The Ultrastudio units are daisy chained, and reliably map CasparCG channel to physical decklink interface. I’m currently using Blackmagic Desktop Video version 12.2.2, but the system worked on older versions as well. I can run either server 2.1.12 (NRK) or server 2.3.3 (LTS) under Windows 10, and both servers reliably map the CasparCG channel number to Decklink physical output
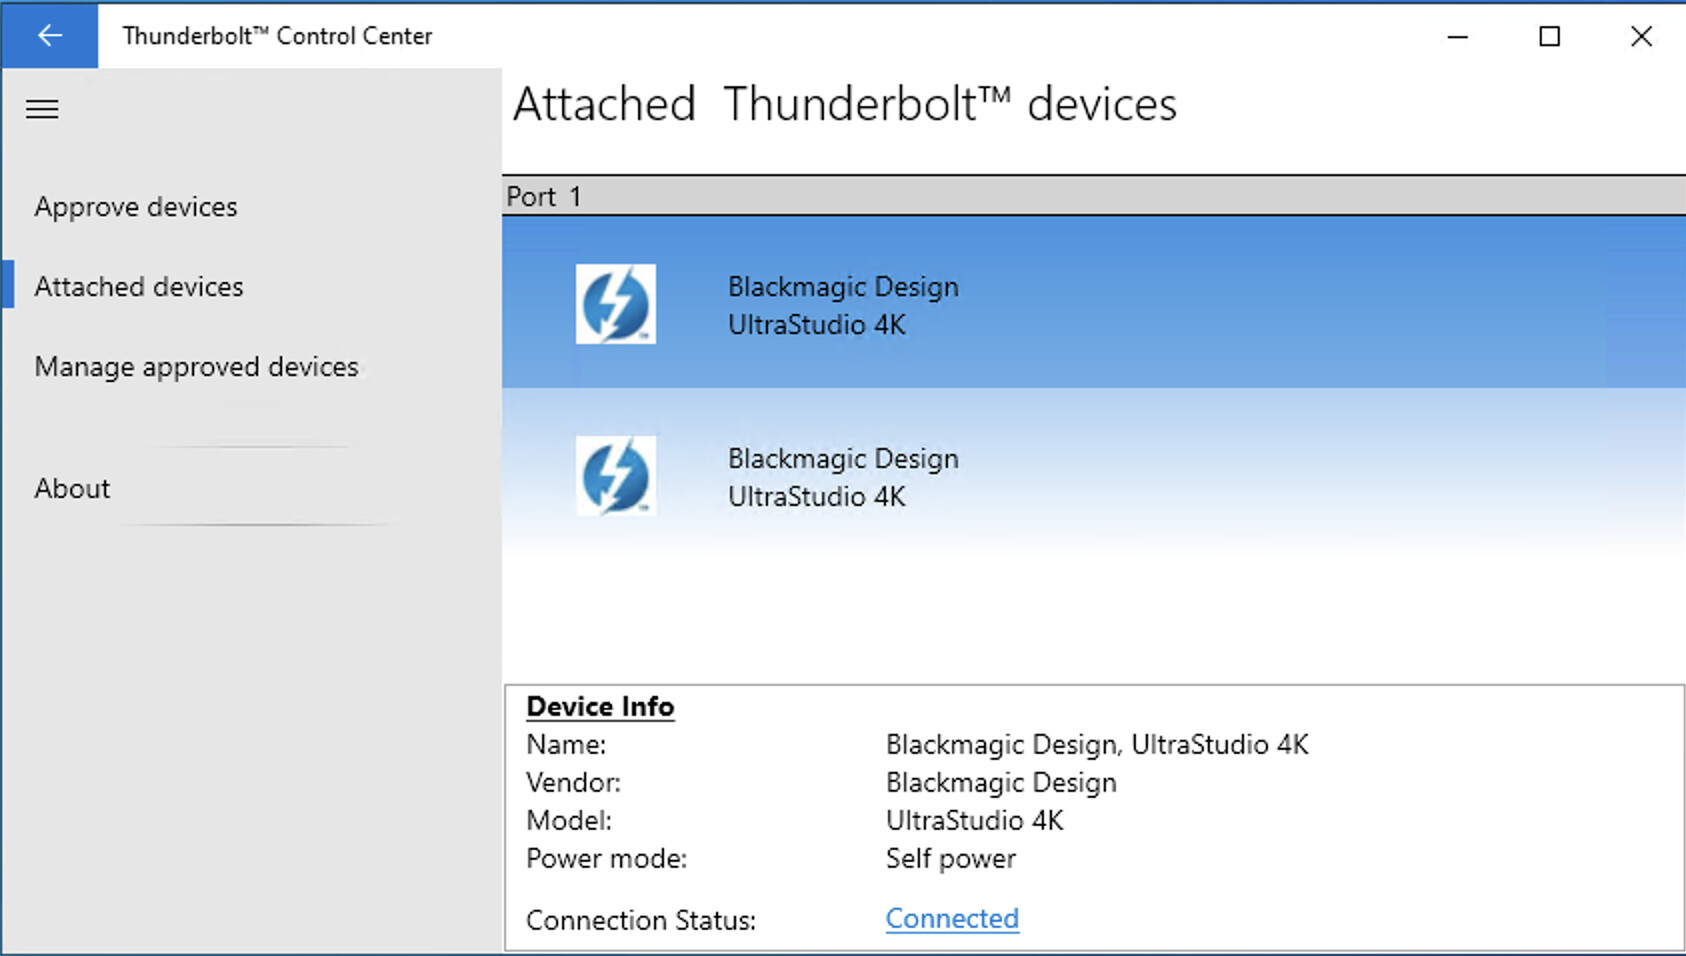
If you run the Desktop Video Setup tool and set the display mode to multiple lines using the icon at the lower right (three grey lines above each other). The topmost summary display is Decklink device 1, and is normally the first device in the daisy chain. If you click on the image of the Ultrastudio unit, you can change the input from the video inputs page and see the selection lamp on the Ultrastudio change, confirming which device is number 1.
The association between the CasparCG channel and the decklink hardware uses the decklink device number as seen in position in the Desktop configuration list. So your configuration file for the CasparCG channel 1 (the first channel in the list of channels) should always output via Decklink device 1 as you have set it to do (via the <device>1</device> entry).
Try removing the <key-device> definitions in your CasparCG config file. The Ultrastudio always provides video and key, and the key device definition is only required when you use two decklink cards one for video output and the second device for the key output.
You are confirming some of my investigations. I’m also using the full width 1U Ultrastudios 4k. And the correlation you’re describing with [the order of the units in Desktop Video Setup] == [the order of Caspar ] is absolutely true. (The one on top equals device1)
But…
The strange thing that bothers me is that when reeboting the computer, the order changes in Desktop video setup. When going thru your suggestions i labeled the devices as “Ultrastudio #1” for the one on top and “Ultrastudio #2” for the one on the bottom. (To keep track of them)
And efter reebooting win10 and starting Desktop video setup… #2 is on top.
Totally swapping the ultrastudios preferred usecase. (And the order they are daisy chained. Now the Ultrastudio connected “closest” to the computer is #2)
Any idea?
Can the labeling somehow have something to do with it? (I’m gonna try that after sending this response) Even tho i’m guessing it has nothing to do with it…
Can i somehow force it to be in a specific order?
Or can i switch the order in the config file (starting with device 2 and then device 1) when assigning my channels to get rid of the problem before starting CasparCG-server maybe? (Gonna try that aswell)
Or is it completely random? (Surely hope not)
Any further aspects of troubleshooting is greatly appreciated. Both for the sake of getting it to work and the absolute joy of testing and finding out new stuff
Deep in my memory I think I saw something similar with allocation swaps when I first built the system - but I don’t recall ever finding the solution, I think the issue just stopped happening. I suspected a Windows update or Blackmagic Desktop update may have helped.
I have seen equivalent issues when using two ethernet NIC cards in one computer. I required different networking protocols on each board, and anything that made windows re-evaluate the internal hardware chains (add or remove a hardware component) would usually swap the protocol allocations - not good for the network operations. In that instance the trick was using different makes of NIC chip, not a style of solution for the Ultrastudios…
I am using an Intel i7 processor NUC unit with integrated Thunderbolt 3 interface. I then use an Apple Thunderbolt 3 to Thunderbolt 2 to connect to the Ultrastudio units. Does your host processor have native Thunderbolt, or have you found a PCI card that provides the Thunderbolt functions?
Also, which version of the Decklink drivers are you using (help screen on the Desktop Video Setup)?
Your third question (edit config file) would work, as the CasparCG server code for Decklink producers uses the device number to associate the Caspar logical channel with the decklink physical unit. But still a real pain having to do the editing of the config file.
I’ll let my brain run in “background deep search mode” and try to recall some other features, and post more if I can find anything.
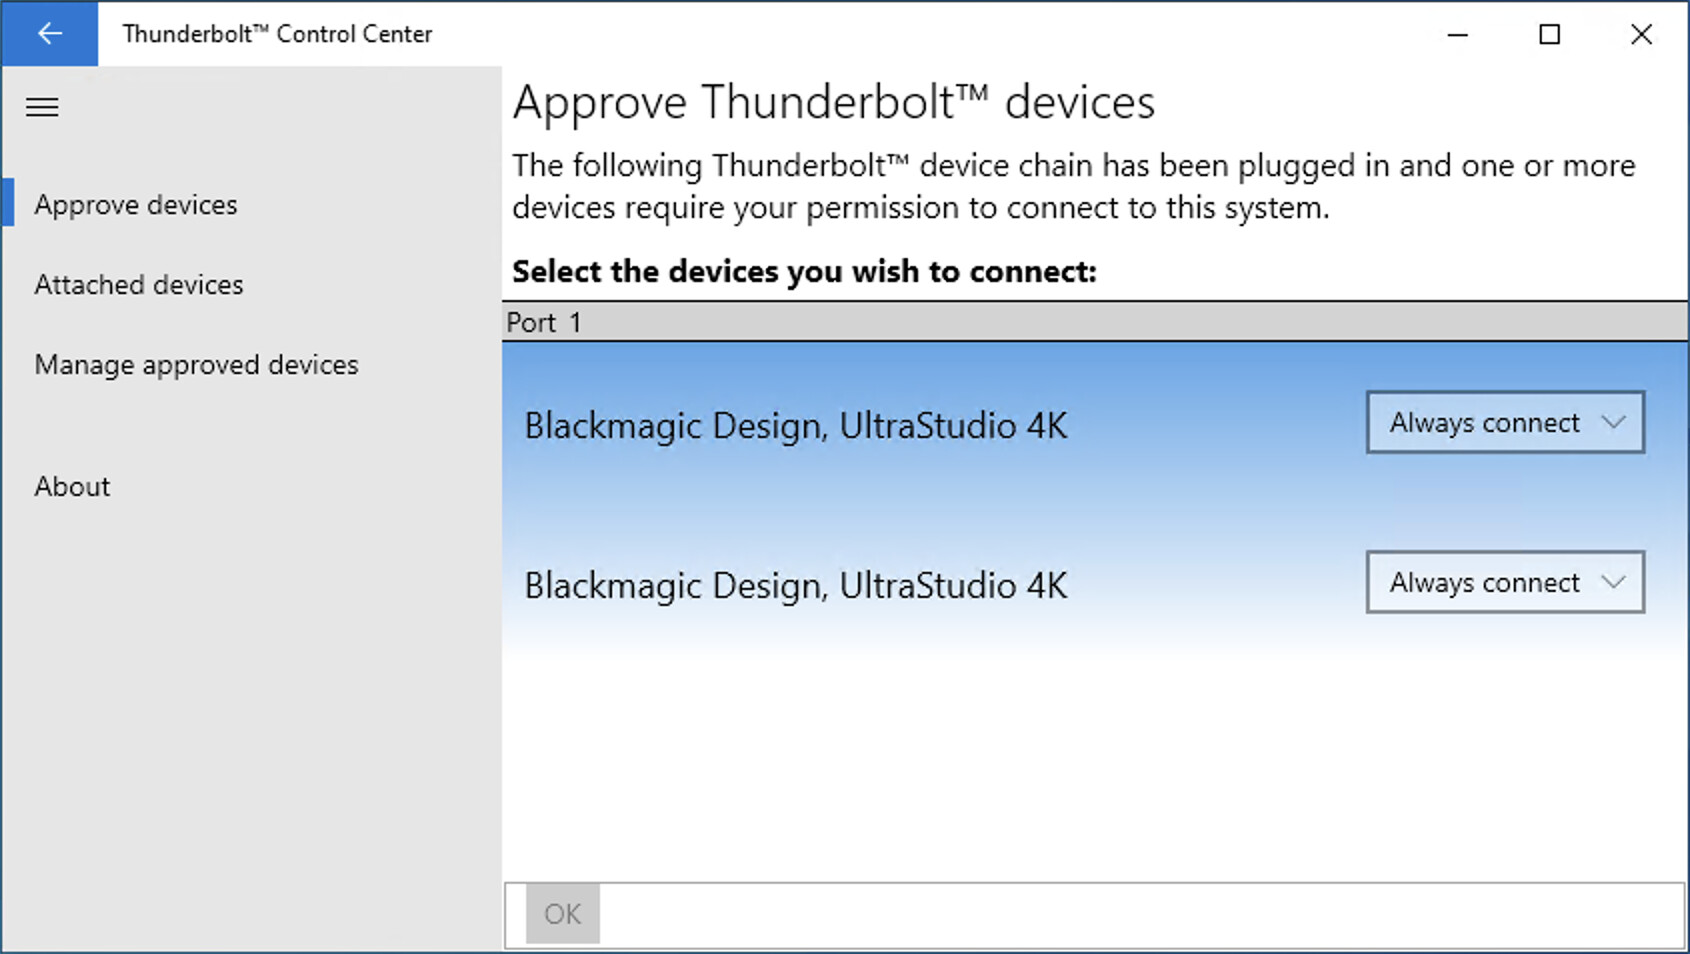
Thank you, @hreinnbeck that ties with my aging memory! I did downloaded a Thunderbolt tool from Intel. Running the tool when the Ultrastudio units were connected allowed me to set them both to “Always Connect”. I think that resolved the issue.
I’m not currently near my NUC, but when I’m near it later this evening I’ll look at the exact name and see if I can find the URL used for the download, then post that here.
The tool I downloaded to my NUC from Intel is called “Thunderbolt Control Center”. The program icon is a white square with a blue circle that occupies most of the width and height. The Thunderbolt flash symbol crosses the blue circle from top to bottom.
When the Ultrastudios are connected and powered the tool allows you to approve the devices and instruct Thunderbolt to Always Connect the device. Other options are “Connect only once” and “Do not connect”. The latter blocks the daisychain at the “do not connect device”.
The bad news is I cannot trace the source of the download, and it is no longer in my Download Retains folder. It looks from some web searches as if Intel have moved some software downloads to the Windows store, and lots of people report now being able to download. Some references suggest Dell also have the file available, but the labeling is not obvious. There are also reports about Windows 11 issues with thunderbolt operations.
I hope you can find the Thunderbolt tool and get it to install on your hardware as I think this will sort you stable connection issues.
For starters i’d like to inform you that the labeling have nothing to do with the order of the devices showing up in Desktop Video Setup. Renaming them to #1/#2, A/B or Top/Bottom would not switch anything around… But some simple unpluging and replugging sometimes did. So no luck there.
Changing the order of the devices in the config-file absolutely worked, and is still a better solution than swapping SDI:s when starting up the rig. But as you said: not ideal.
Sorry for not telling you earlier, but the system running is windows on a bootcamped mac 16" 2020. So i’ve got thunderbolt ports out of the computer, TB3->TB2 “dongle”, into the Ultrastudios.
Using 12.2.2 on Desktop Video Setup aswell.
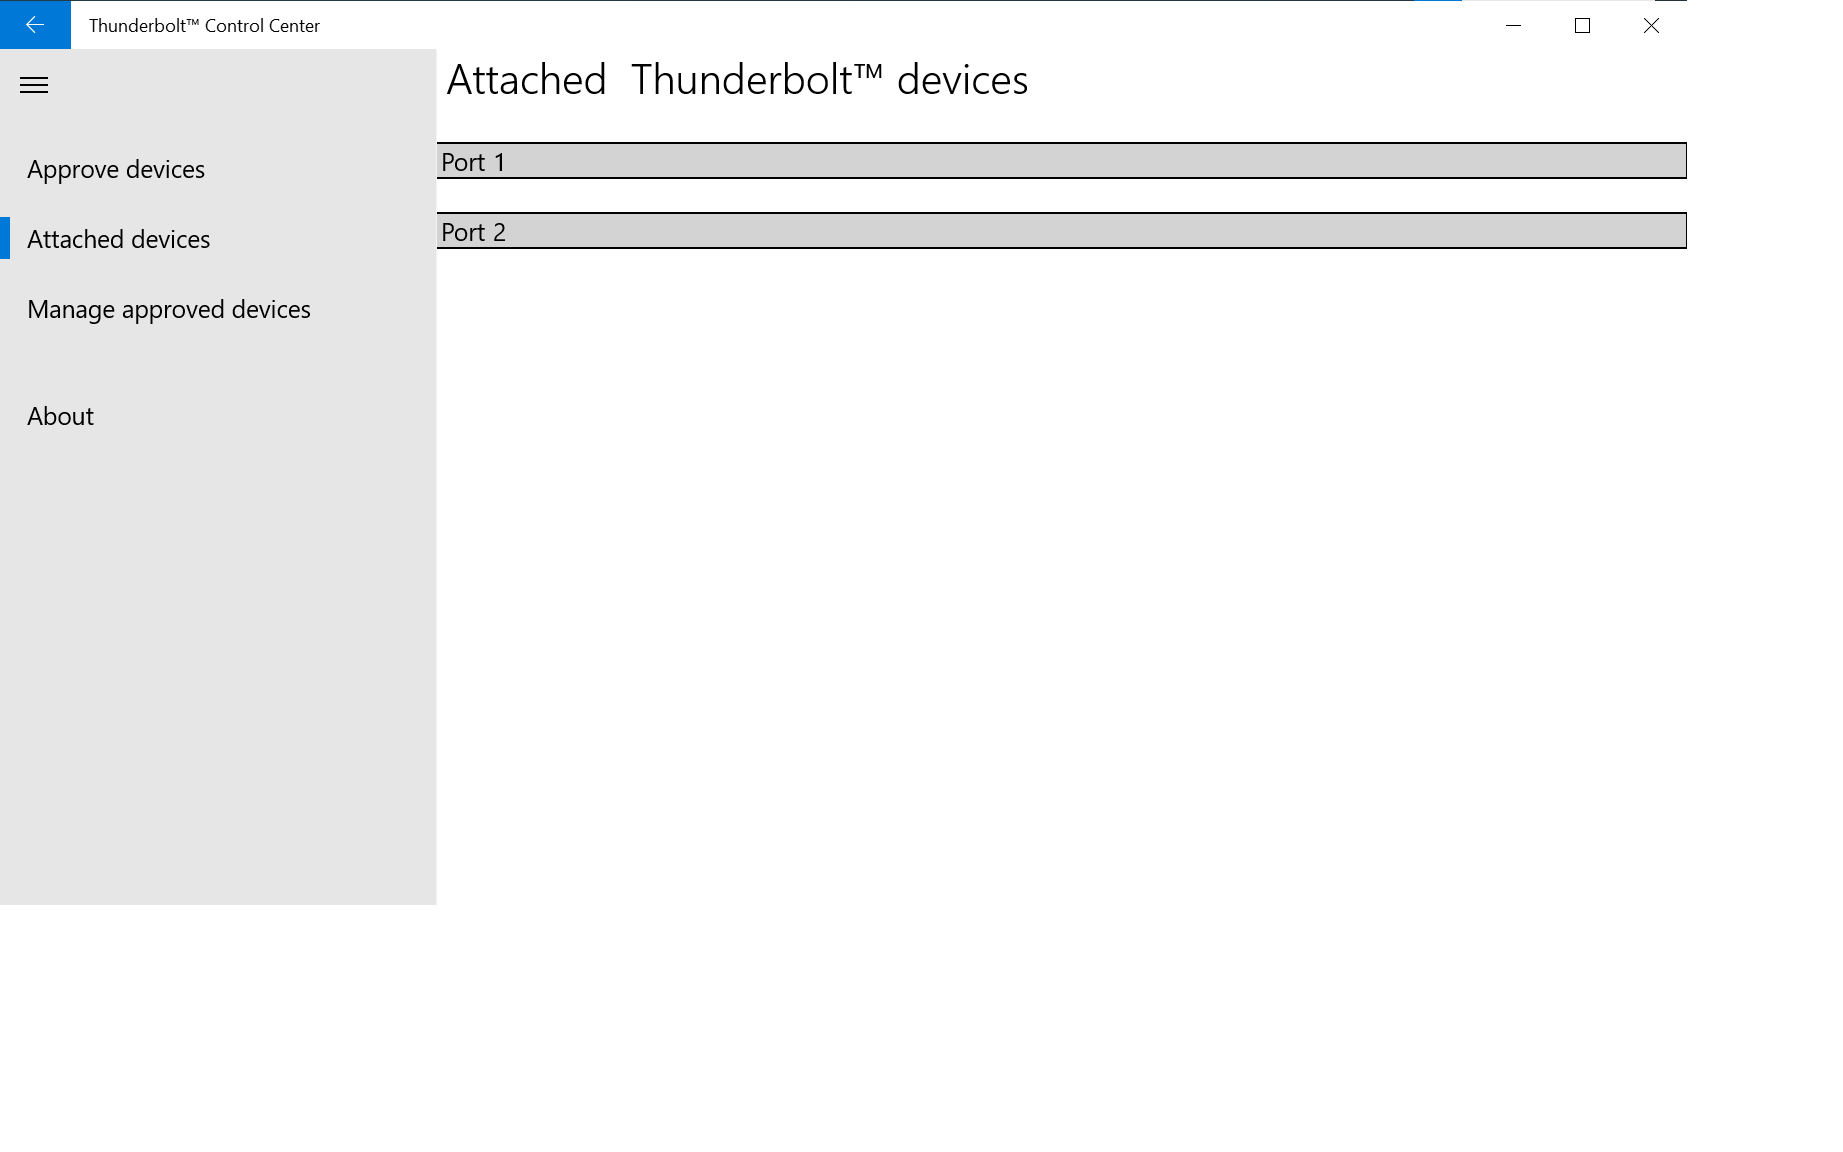
So, moving on to the Thunderbolt Control Center. I’ve installed it but when running it, it seems like the software recognizes the devices, but i can’t do anyting with them. It just says “Port 1” and “Port 2”. (See attached image) I can’t right click, double click, expand, drag’n’drop or anything. Under “Approved devices” and “Manage approved devices” it’s all empty…
Thunderbolt drivers are up to date.
Maybe it’s a bootcamp-thing?
But if so: wouldn’t more stuff “not work”?
Got any ideas? Or do i just have to live with editing the config-file?
If you have already set the Always Connect action, I can try my Ulltrastudio Units on an older (2015) Thunderbolt 2 Macbook Pro with bootcamp and Windows 10. I do not think that computer has the Thunderbolt control centre fitted but I would normally only have a single Ultrastudio connected. The combination was my portable demonstration system for graphics. It may be Sunday before I have the time to test my Macbook on the pair of Ultrastudios.
I suspect that the Port 1 and Port 2 labels on your Attached Devices screen are references to Thunderbolt Ports on the computer. The computer is not seeing anything on those ports, or there would be information in a window below the grey line.
But clearly the computer communicates with the Ultrastudio units as you get images/videos played.
Exactly. Right now i got the thunderbolt plugged in the right side of the computer. If i change that to the left side, “Port 1” and “Port 2” disappears and “Port 3” and “Port 4” appears instead. Which seems strange and tells me the software is surely getting something. But it’s not what it expects or something
It seems from several web posts that Thunderbolt devices, especially Thunderbolt 3, under Windows 10 can be troublesome.
I found a posting that has an extensive set of things to try, and mentions use of Windows via bootcamp on a Mac. I suspect you have done most or all of the steps already, but for reference the article is available at https://www.caldigit.com/thunderbolt-3-devices-in-windows-10-platform/ .
I have been able to connect my daisy chained Ultrastudio interfaces to my mid-2015 MacBook Pro that runs the latest updated Windows 10 via BootCamp. The computer has two Thunderbolt 2 interfaces.
Unfortunately the results do not help resolve your problem of the changing device allocations, but I’ll include below some results in case they assist a future reader.
I do not have the Intel Thunderbolt utility on the MacBook. I suspect the functionality is delivered by an Apple Bootcamp thunderbolt driver. The first UltraStudio device in the daisy chain was always device 1 in CasparCG server version 2.3.3_LTS, the final device in the daisy chain was always device 2. Despite may re-boots of the Windows 10 OS the output channel allocation was unchanged.
I swapped the Thundebolt port used at the computer end of the chain, but no difference in configuration occured.
As said in an earlier posting I have a stable assignment of the Ultrastudios when used on my Windows 10 NUC (Thunderbolt 3 on the computer adapted to Thunderbolt 2 via an Apple converter). The novel feature is that the two Ultrastudios have the opposite CasparCG channel number to that when running the same server version on the MacBook/Bootcamp machine.
Hi Andy! Thanks for checking with your mac!
I’m really grateful for your support in this matter.
For now i’m gonna go with “the device swap” in the config file as my solution, but if anyone in the future finds any solution to this, i will be very happy
Thank you again for all your testing and knowledge sharing!
Shame we can’t establish what is happening with your Ultrastudio units device enumeration.
I have found several articles that describe some properties of Thunderbolt 3 interfaces, and thus increased my knowlege (always good to do!). One of these is available at https://www.dell.com/community/Latitude/Demystifying-Thunderbolt-3-Security-Levels/td-p/7529712. One issue with Thunderbolt is it extends the PCIe connection outside the secure “box” that is the computer housing, potentially introducing a security risk where a peripheral could connect and use DMA transfers into memory in a malicious way.
Various strategies are now fitted into a PC to mitigate the risks, and managing the mitigation strategy is one of the jobs of the Thunderbolt Control Centre software. When a user tells the control centre to always allow connection the device unique ID is recorded in an access control list on the computer, and an identifier is stored in the device non-volotile memory
Several articles I found suggest that a feature of the Apple Bootcamp software is that it sets the Thunderbolt ports into the lowest security mode (level SL0) - allways allow any device. This is one possible reason why your Thunderbolt Control centre did not show any devices as they are pre-authorised in bootcamp. Another possible reason is the latest version of the control panel only works with the latest mode of drivers, and these are not usually installed by Bootcamp.
You may also find it useful to have a play with the AMCP ADD and REMOVE commands. I think you can use these to avoid editing and rewriting the config after each boot. You can remove the decklink consumer from channel 1 with a command of the form:
REMOVE 1 DECKLINK 1
where the first ‘1’ is the channel number and the second ‘1’ is the decklink device number. You can then add a decklink consumer using:
ADD 1 DECKLINK 2
which uses decklink device 2 for channel 1 output. The remove and add commands can be issued by the SVT client using the custom command tool, and either a preset or a named rundown used to keep the commands on hand. So if your system boots into the non-desired output routes, you can run the group of commands to swap the outputs.
It will need an experiment or two typing the commands directly into the server window to establish the device numbers when the system has booted in the wrong mode.