Attempting to understand HTML Templates and Alpha Channel

Last year I created a scoreboard HTML Template and used a CasparCG screen consumer to output the video to my ATEM Mini Pro. I have a limited knowledge on this stuff, but I was able to make the scoreboard overlay my live feed by turning the HTML color green and using the ATEM to chroma key it. This worked in a pinch last year, but this year I’d like to understand how to utilize the Alpha Channel for a cleaner look…

So my question is, how would I go about rendering an HTML template in CasparCG and output it as video to my ATEM board and output the Alpha Channel to my ATEM board too. I understand that this will take two HDMI inputs up on my ATEM. I just don’t understand Alpha Channels so much, or how CasparCG can output this…

Thanks for any help in advance!!

1 Like

Hi, codyroche, for your need, the first thing is preparing a playout card such as DeckLink duo 2 that at leat have two output so that you can have both fill and key output.

The principle is that the key output like a mask, it only contains color between white and black. it tells the switcher which part of the fill output is transparent, so that the switcher can create the so called Alpha Channel.

After that , you should configure you CasparCG server, let it output the key and fill channel. you can watch the tutorial below.

Once you finished those things above, you can try to make some HTML templates. Just remember always set the background-color of the body tag to transparent.

Finally, connect the key and fill output to your switcher. set the key and fill channel to your switcher’s Downstream key. then check ‘pre Multiplied key’.
image

Now you can try to play the HTML template, the CasparCG will automaticly output the key and fill channel, like the video blow.

Hope that I make it clear.

1 Like

As Izx1995 states, you need a pair of outputs available for video and key. As your Atem Mini Pro is HDMI input only you will also need two identical SDI to HDMI converters. The Decklink Duo 2 is a good card choice as you can pair two channels and ensure that the changes in the key output occur exactly in time with the changes in the fill output. Important for dynamic (moving) templates.

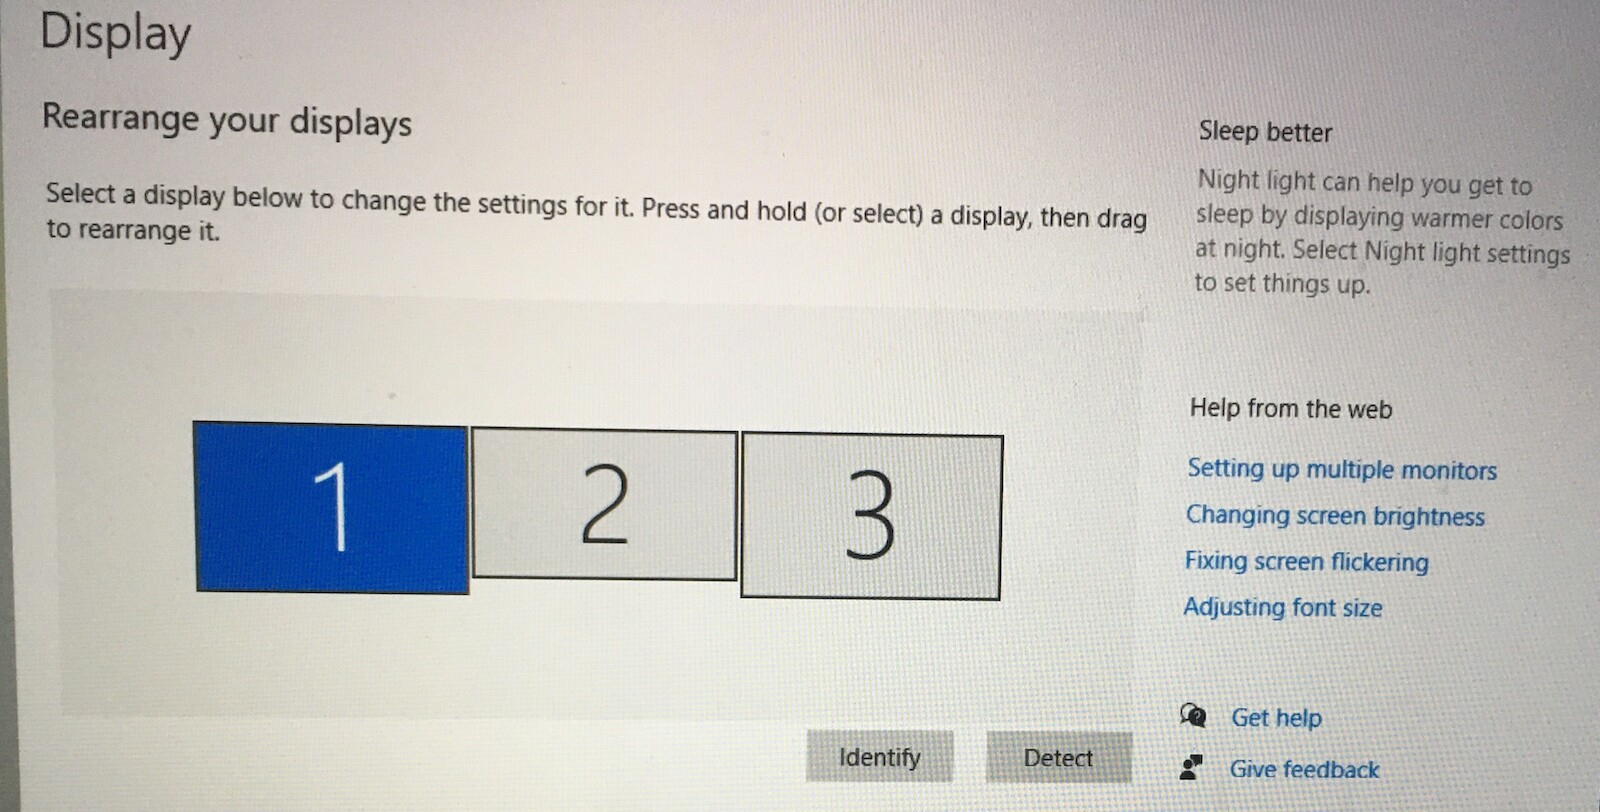
If your computers graphics card has multiple HDMI capable outputs, at least 3, you may be able to do some experiments without buying the Duo card, but you will need such a card when you are ready production operations. The outputs from the graphics card are the standard windows operational screen on output 1, a screen consumer at full screen on output 2 and a screen consumer on output 3 at full size.

Connect the graphics card HDMI outputs from outputs 2 and 3 to two inputs on your Atem Mini.

Edit the server configuration to initially set the consumers sections of CasparCG Channel 2 to be something similar to:

<consumers>
   <screen>
      <device>3</device>
      <aspect-ratio>16:9</aspect-ratio>
      <stretch>fill</stretch>
      <windowed>false</windowed>
      <key-only>false</key-only>
      <vsync>false</vsync>
      <borderless>true</borderless>
      <interactive>false</interactive>
      <always-on-top>true</always-on-top>
      <x>0</x>
      <y>0</y>
      <width>0</width>
      <height>0</height>
      <sbs-key>false</sbs-key>
      <colour-space>RGB</colour-space>
   </screen>
</consumers>

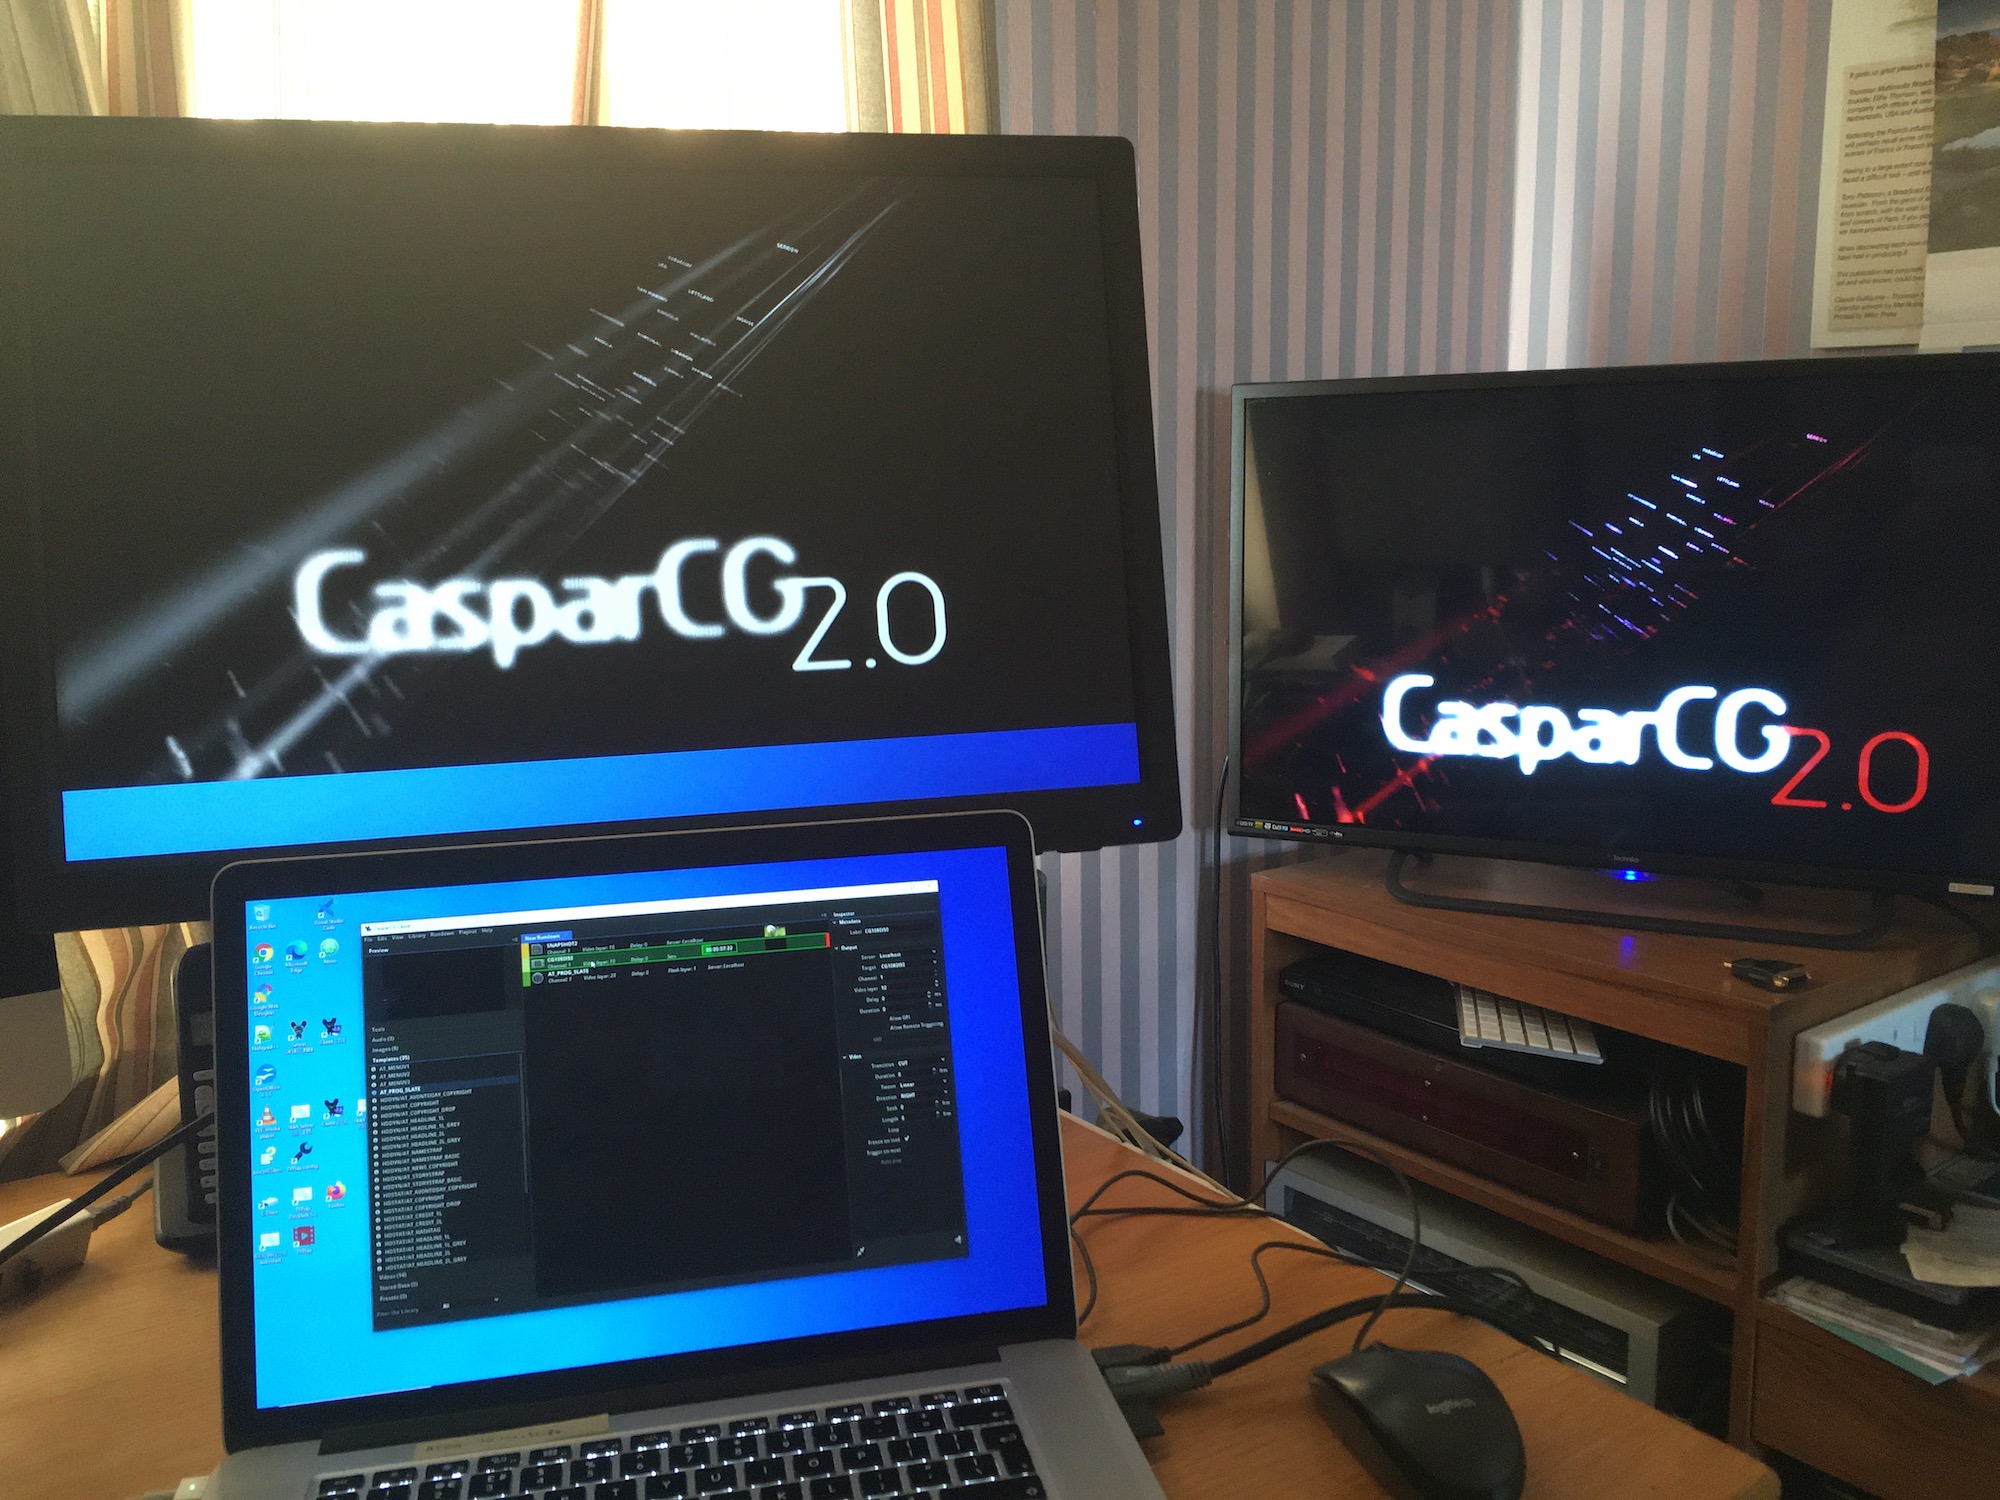
This will be very similar to the config for channel two, the main difference is the device (screen) number. Start your server, and play a video or template on channel 2. As you switch between the ATEM channels connected to the graphics card you should see the video or chromakey template on both ATEM inputs.

Re-edit the server config file for channel 2, changing the key-only entry to true.
<key-only>true</key-only>
This tells channel 2 to output the grey-scale key signal when it outputs any video or template.

Now for the cunning trick. In the client locate the Route Video Layer command (in the Tool Other section). Add this command to the rundown. In the Output section of the Inspector select the server (eg Localhost), set the channel to 2 and the layer to 20. In the Route Video Layer section set Channel 1 Layer 20. When this command is run it tells the server to copy anything playing in layer 20 of channel 1 across to layer 20 of channel 2. The configuration of tells channel 2 to select the key not the fill.

Now play a video or template in channel 2 layer 20. You should find you have one full-colour signal on the ATEM input, and one greyscale picture on the second ATEM input.

Follow the guidance given by Izx1995 on how to configure the ATEM keyer, and you can now develop and test your HTML-5 templates.

I emphasise that this use of the graphics card is only to enable your learning about templates and keys. You must use a Decklink card and SDI to HDMI converters for your operational production system.

1 Like

There is this setting
<sbs-key>true</sbs-key>
that should allow to place fill & key Side By Side (sbs). I newer tried this, so I don’t know if it works.

1 Like

I have just tested the the side-by-side key mode (thank you for explaing what sbs means), and it is operating on my single screen, having doubled the allocated width of the video element.

So if there is a graphics card with three outputs and output 2 can be set to flow onto output 3 it should be possible to do full operations into the HDMI only input ATEM.

1 Like

You guys are AWESOME! I was really struggling to grasp the basics of CasparCG here. But based on your answers, I believe I have a working solution… We have a very limited budget currently and our setup needs to remain mobile so we’re kind of cobbling our solutions together as we go. I’ve seen numerous posts mentioning the Duo cards, but I never realized you could use these as outputs. Regardless, I have everything running from my laptop, so Duo cards won’t work for us for the time being. I think(??) I’ll be able to make this work by using a usb to hdmi adapter on my laptop… maybe I’m wrong on that and there will be some unforeseen issues. But last year, I know I used my laptop’s HDMI output as an input to my ATEM board and made the screen consumer full screen on that “monitor” so I’m assuming I can just do that again with the usb to hdmi adapter for the alpha channel.

the method you mentioned have a potential problem, the key and fill output must be sync, or you will not get a usable alpha channel. If you use some kind of usb to HDMI converter, it may cause some delay and make the key and fill channel out sync. you can have a try.

I agree with Izx1995 that there is a potential time offset issue between an onboard HDMI and an external HDMI.

This may not be a problem when using unanimated lower thirds that are mixed/cut to air using the ATEM keyer. If animated overlays are required it may be necessary to test out a USB 3 to dual HDMI interface. A couple of example interfaces are Dual HDMI Example 1 and Dual HDMI Example 2 offered through Amazon. I have not tested either unit, I just suspect that if both HDMI outputs are in the same hardware container they are most likely to have similar timings. Even then the individual start of scan on the two outputs may be offset and drifting in time relative to each other. The frame syncronisers in the ATEM inputs can add an extra layer of complexity to the timing. But an external USB to HDMI of any form will enable experiments on creating HTML templates.

A dual interafce unit that supports the Windows extended desktop would also allow a single CasparCG channel with the screen consumer including <sbs-key>true</sbs-key> will give a good test platform at minimum cost.

Cody,
I wrote an introduction to the CasparCG server and standard client that you may find provides some background information. This is available via Github via this link CasparCG Overview.

There are a couple of good articles on writing CasparCG HTML written by Reto Inderbitzin. The first article in the series is available at https://medium.com/@indrch/introduction-to-casparcgs-html-producer-391c81a4c4f

I’m back! We had our first live stream of the season last Friday and I was unable to get this to work in practice. It would have worked, but I was unable to get both screen consumers to enter full screen on their respective desktop. Best I could do was to use “windowed” versions and drag them to their desktops. But this left the window title bar visible if I was to try and use it inside ATEM as a downstream keyer, and I couldn’t figure out how to crop the top off while using the downstream keyer. I am assuming that if you put two screen consumers in the same channel, it won’t let you split them between devices… And I tried selecting the windows while in full screen and using Win + direction keys to move them, but they wouldn’t budge between screens. I assume this is where the tag comes in handy, but I couldn’t get this to work and can’t find any examples on how to use it. It didn’t seem to change anything however I’d use it.

Here is my config file as I tried to make it work last week:

    <channels>
      <channel>
          <video-mode>1080p3000</video-mode>
          <consumers>
            <screen>
              <device>2</device>
              <aspect-ratio>default</aspect-ratio>
              <name>Main</name>
              <windowed>false</windowed>
            </screen>
            <screen>
              <device>3</device>
              <aspect-ratio>default</aspect-ratio>
              <name>Alpha</name>
              <key-only>true</key-only>
              <windowed>false</windowed>
            </screen>          
            <system-audio />
          </consumers>
      </channel>
    </channels>

Can you describe the actual behavior of the tag and how to use it. Or at least explain how I messed up my config? lol

Thanks again!

There are a couple of useful resources to you may find useful in editing and testing your config files:

  1. A config file validator: https://casparcg.net/validator/
  2. Description of the config file tags: https://casparcg.net/validator/explained.html

Edited by author to remove example (inadequate) config. See subsequent post for config in a tested system.

I have been able to build a simple test rig, enabling me to check the configuration settings for the screen consumer channel operating as fill and key. Note the test rig does not include an ATEM, so no fill to key timing timing tests could be made.

Test system used a 2015 version Macbook Pro running Windows 10 via bootcamp. The screens were the laptops own VGA screen running at 1920 x 1200 (Windows display 1), an HDMI connection to a 1920 x 1080 HDTV (Windows display 2), and a Thunderbolt 2 to DVI to HDMI to 1920 x1200 computer monitor (Windows display 3). These monitors are arranged as an extended desktop using the Windows 10 display tools. See photo below.

The channels part of the config is set as shown below.

<channels>
  <channel>
    <video-mode>1080p3000</video-mode>
    <consumers>
      <screen>
        <device>1</device>
        <aspect-ratio>16:9</aspect-ratio>
        <stretch>none</stretch>
        <windowed>true</windowed>
        <key-only>false</key-only>
        <vsync>false</vsync>
        <borderless>true</borderless>
        <interactive>false</interactive>
        <always-on-top>true</always-on-top>
        <x>1920</x>
        <y>0</y>
        <width>1920</width>
        <height>1080</height>
        <sbs-key>false</sbs-key>
      </screen>
      <screen>
        <device>2</device>
        <aspect-ratio>16:9</aspect-ratio>
        <stretch>none</stretch>
        <windowed>true</windowed>
        <key-only>true</key-only>
        <vsync>false</vsync>
        <borderless>true</borderless>
        <interactive>false</interactive>
        <always-on-top>true</always-on-top>
        <x>1920</x>
        <y>0</y>
        <width>1920</width>
        <height>1080</height>
        <sbs-key>false</sbs-key>
      </screen>
    </consumers>
  </channel>
</channels>

Device 1 is set with an <x> value that matches the width of the laptop screen, with the display set at the top of the monitor area (<y>0</y>). The width and height tags set the resolution required for a full-HD screen. Device 2 also has an x value of 1920 which acts, in this configuration, as an offset relative to display 1. Display 2 also has it’s height and width set for a full-HD display.

Display 1 shows the fill, and display 2 show just the key signal (<key-only>true</key-only>). Setting the two screens to have borderless and always-on-top true ensures the mouse cursor does not show on the display areas of the fill or key images.

The configuration in use can be seen in the photo below.

The SVT client is visible on the laptop screen. Immediately above the laptop screen is display 3 of the Widows desktop. The zone of Windows background is visible because this monitor is 1920 x 1200. We can see the video content is the key (greyscale image). The display to the right is Windows display 2, and shows the fill content. The CasparCG server is playing one of the common test files (CG1080i50.mov with associated key video CG1080i50_a).

I changed the laptop screen resolution, and checked the changes needed in the casparcg.config definitions. The only change was the value set for <x> of the first device. When the LCD screen was set at 1600 x 1200, this required <x>1600<\x>. Similarly with the LCD operating at 2880 x 1800 required <x>2880</x>.

I also tested the side-by-side key operations, but this never gave a valid key.

But if you have a laptop with a Thunderbolt interface why do you do all this painful experimentatiin and not simply get you an Ultrastudio HD? This just works

I did the experiment with HDMI to prove there was a potential solution to the question that Cody asked.

Hidden behind the laptop are two Thunderbolt-2 interfacing Ultrastudio 4k units bought a few years ago before Thunderbolt 3 became common. The Thunderbolt connection daisy chains through the two units giving me 2 SDI fill+key outputs and 2 SDI inputs. These, plus a quad split interface, allow me to check both video and key on a single Ultra HD TV display during template developments.

The new Ultrastudio HD and mini-Ultrastudio 4k are only Thunderbolt 3 with no daisy chain ability. You need the Extreme 3 to recover daisy chain abilities, but the Extreme 3 is not a low cost device! The Ultrastudio 4k devices can connect to either the Macbook when I am on the road, or (more normally when working at home) connect to a NUC i7 with a single Thunderbolt 3. Connection to the Ultrastudio 4k is via an Apple Thunderbolt 3 to Thunderbolt 2 adapter. If I were starting with new hardware I would look at one of the PCIe expansion chassis and a Duo 2 card.